Sunday, 31 January 2016

How to make a tag with a Curvy Corner Trio Punch


The Curvy Corner Trio Punch is three punches in one. It cuts two corner designs and a ribbon slide for ton of tag options. 

Then how do you make a tag with this punch?! 

It's really easy if you use a sheet of grid paper, that Stampin'Up! carries. It has ' 0 ' in the middle of the sheet so you can find the centre of the paper really easily.  
For example, this paper width is 7cm so align the paper 3.5cm on both sides. Then pencil mark the '0' position.

See the line on the punch? Align the centre line of the paper with it.

The first key point; press the middle of the punch with your palm instead of the one corner.You get much cleaner cut. I am pointing out where you put your palm.


Now you have a hole in the centre of the tag. How easy is that !!


Then punch out each corner.

Here is the second key point; Don't move the punch when you punch out the other corner. The curvy part of the design is asymmetric. So if you want the both side look exactly the same, you need to reverse the paper.


Ta-da !! You made a tag.


Here is another example. The skinny tag.


I love that I can make the tag any width I want with a Curvy Corner Trio Punch.


Here'the deal; for every $90 AUD you spend (before shipping and handling), you get a FREE Sale-A-Bration product. That means it's the perfect time to purchase those products you've had your eye on while earning more products for free. Contact me how ! 
Built for Free Using: My Stampin Blog

Friday, 29 January 2016

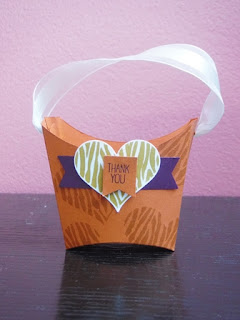
Cute mini tote bag with fry box die


I have made a lot of fry boxes using fry box dies. But that's not all. You can make a mini tote bag with the die. 


Here is how. Fold the card stock  in half. Place the cardstock, folded side down on the die.


Place the card stock  one the die at the position where you see the half of the rest of the die. (Hope that make sense to you.)


And cut out ! Put it together as usual. It looks like the regular fry box but it is shorter and both sides are same length. I punched the holes to attached the ribbon as a handle.  

The ribbon is glued with glue dots. I used the 1 inc circle punch to hide the ugly bit inside the ribbon handle. 


You need die cut machine to create this cute mini tote bag. If you haven't tried die cutting yet, just contact me. I will show you what die-cut is and how you can have fun with it.


Here's the deal: for every $90 AUD you spend (before shipping and handling), you get a FREE Sale-A-Bration product. That means it's the perfect time to purchase those products you've had your eye on while earning more products for free. Contact me how !

Built for Free Using: My Stampin Blog

Wednesday, 27 January 2016

born to be loved

When it comes to Valentine's Day card, you think automatically ' Pink ', ' Red ' or ' Heart '.
However, if the receiver is a guy, bright pink with a big read heart, screaming Valentine's Day ! card maybe a bit too much ?! Especially if the guy is your teenage son. I know my 19 year old nephew would not appreciate that sort of card from me.   

Here is the Valentine's Day card for a guy. Black and White with little bit of muted colours. 


I used the Banner Punch to create the fish tail on both sides.

Of course there are hearts here and there but not screaming. I love the zebra pattern heart stamp.
It's really cool. Wood heart is from Love Blossoms Embellishment kit.


I like how the outline heart peaks out.


With Silver Baker's Twine, even a bow doesn't look girlie.


This could be a birthday card for someone special.

Would you like to know how to make this card ? Just contact me and I show you how easy it is. 


Built for Free Using: My Stampin Blog

Monday, 25 January 2016

Botanical Paradise

When I saw the Botanical Builder dies at first, I couldn't believe my eyes! It is so cool that some parts are not cut so you can create 3D flowers in second ! No extra work needed. 


If you are new to these gorgeous dies and stamps, please take a moment to watch this video.And you know why I got so excited. 

So I ordered the Botanical Blooms Photopolymer Bundle and coordinated DSP, Botanical Gardens, in my starter kit.
Now I have my Big Shot back, the first thing I did was die cutting the leaf edge. 


I don't have the Precision Base Plate yet but I used my magnetic platform to cut it so die doesn't move while cutting.


It cut very well without the Precision Base Plate but I let the die go through the Big Shot a few times to make sure it cut well.  I may not need to do that with the Precision Base Plate.


Next  I cut the floral die.


Ohe yeah ! Soooooo cute.  


I cut the Botanical Garden DSP with the same leaf edge die and put it and the old olive one together. It is not my original idea. I have seen other demonstrators doing this way and I wanted to try it myself.  I glued all parts on the copy paper and mounted it on the base card. This technique is called " Die Cut Inlay "

Very happy with the result.   


The sentiment is from Flower Patch stamp set. I think it goes very well with the card design. 


I really love how this card turns out.  It looks so complicated but not really.
All I did was die cutting, gluing and stamping.    My Big Shot did the work mostly for me.

If you are interested in making this card, just contact me. I show you how easy it is !

Built for Free Using: My Stampin Blog

Sunday, 24 January 2016

I missed you ! BIG SHOT.


My boxes from Japan finally arrived yesterday. 9 of 15 boxes have my stamping and cardmaking stuff!

I missed my stash so much and most of all I missed my Big Shot terribly. 
I can't remember the days I didn't own Big Shot or any kinds of die cut machine. Once you tasted die cutting, you can't live without it. 

So I dug in the boxes and found my Big Shot and a fry box die.  I love this die and I have used it so many times. 

I like to decorate the front of the box with DSP.
It is so easy to do. Just put the paper on the exact part that you want the paper to be cut. I need only this part on DSP .

So I placed the paper like this and run through the Big Shot.


I used the banner stamp from the Number of Years stamp set so I can stamp a little  flower and leave stamp in a different colour. Make sure you get "Number of Years Bundle" instead of a Number of Years stamp set and a coordinated die separately. You can get 15% off for Bundle. 

"Thanks"is from Endless Thanks set. 


If you would like to know how to make this cute box or would like to make one by your self, feel free to contact me at satomiwellard@gmail.com or click CONTACT ME tub. 


Built for Free Using: My Stampin Blog

Wednesday, 20 January 2016

Smart " Smart Phone Cover Insert "


I have been thinking about this project for a while; making my own smart phone cover insert.

I recently got my SAMSUNG in Australia as my first smart phone. Yes! I was using the old fashion mobile phone even I lived in Japan for 4 years. Not all Japanese are tech-savvy, you know.

I probably didn't need a smart phone even in Australia but I WANTED to make my own insert !! That's a good enough reason for a crafter to switch a phone from an old fashion to a smart one.  

So here it is. I used the birthday bouquet designer series paper and a groovy love stamp set. I love this sentiment "You make my heart go BOOM-BOOM."


It is so easy to make your own. I just cut the paper for the size of the phone cover and rounded the corner with a corner rounder punch. I used the curvy corner trio punch instead. 
And pencil mark the camera hole and cut it out with scissors.  You really need sharp scissors for this. I used my Paper Snips. You need a transparent phone cover. Well that is the whole point. You want your pretty insert see through.


Because the DSP is double-sided so you get 2 inserts from the one sheet. Yeah ! reversible insert. 
This is A side. 

And this is how my phone looks . How cute is that !  Love it !!


And this is B side. For this side I sued one of the SAB set, " What  I Love ".


Now I can change my phone looks anyway I want, any time I want without buying different covers.
The best of all it is all original. One and only in this world.


Built for Free Using: My Stampin Blog

Saturday, 16 January 2016

Stamping and Cardmaking 101 Jan.2016 project-Bloomin' Love Stamp set


I hold 3 types of classes every month. 

One of them is Stamping and Cardmaking 101.
This class is For absolute beginners for stamping and cardmaking.I show how to make easy but beautiful cards as well as how to use basic tools.  You will make 2 projects to take home.

And these are the projects for Jan.2016. The stamp set used is Bloomin' Love.

Here is the first project to make. 


It is really simple but fun to make.  Just stamping one stamp after another and you can make pretty designs. Add a bit of coordinated paper from Love Blossoms Designer Series Paper Stack for accent.


For the second project, you have 2 options to choose from.

Option 1: A gift tag


Option 2: A 3x3 mini card 


These projects are really versatile. You can easily adopt the design to recreate cards and tags for different occasions by changing sentiments or colour combinations. And I will show you how in the class.

Click " Classes" tub for the details.
Built for Free Using: My Stampin Blog